PHOTO TECHNIQUES
IMAGINE SCROLLING THROUGH SOCIAL MEDIA posts or flipping through your favorite dive magazine. Your eye catches a photo of the most pristine waters you have seen. The sun is peeking through the surface, beautifully illuminating coral in pops of color in every direction. A diver overhead perfectly balances the composition.
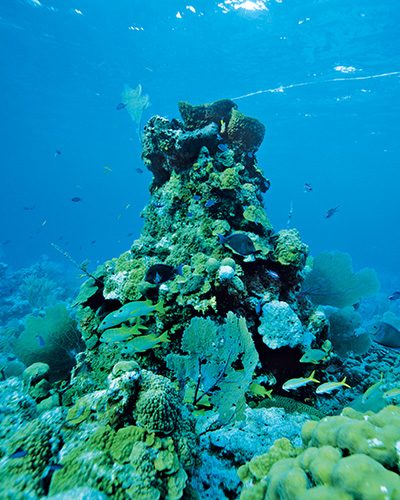
You can’t get this photo out of your head, so you book a trip, fly across the world, and get into the water. In perfect light, you raise your camera, check your composition, and take the image of a lifetime. To your surprise, however, the pops of color you envisioned are gone. Overwhelming green and blue tones overpower the reds, yellows, and purples.
This is an obstacle that every underwater photographer and videographer has had to deal with since the dawn of underwater photography. The problem lies in water density and color filtration as a function of depth. The good news is that our cameras have ways to offset this color loss — the most crucial being white balance.
Effect of White Balance
White balance, or color temperature, is critical in how your camera renders color in different lighting environments. Color temperature can have a psychological effect on how the viewer sees an image. Warmer tones draw our eyes; this is why subjects in a studio are often lit with warm light and photographed in front of a cool-toned background. Think of a cool, dark underwater cave versus a warm, sunny reef. They have two completely different feelings from the white balance of those environments, which helps set the mood.
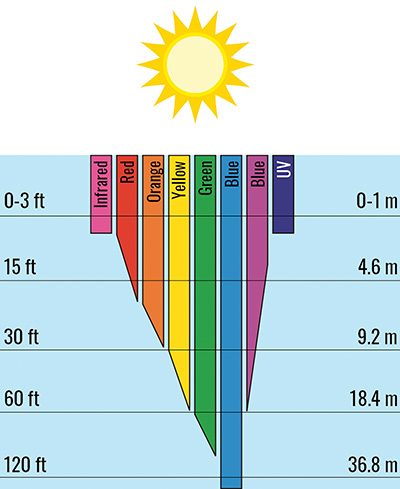
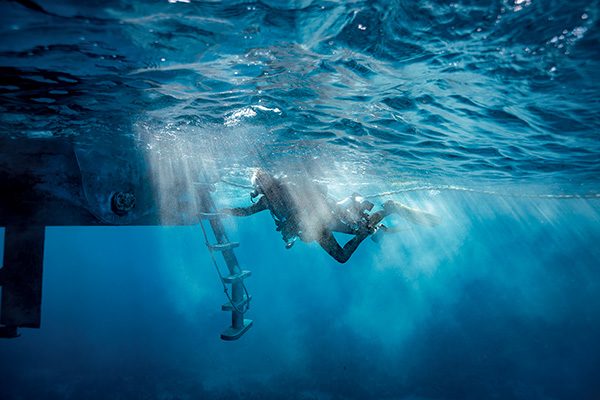
The basic principles of white balance still apply underwater, but we can use it differently from our topside shots. A color depth chart shows that water filters out more colors of the white light spectrum as depth increases. It’s fascinating to watch how quickly the color shift occurs once you start to notice it. Red is the first visible color to disappear, just an arm’s reach from the surface. The light hitting your camera’s sensor almost instantly is no longer 100 percent white light.
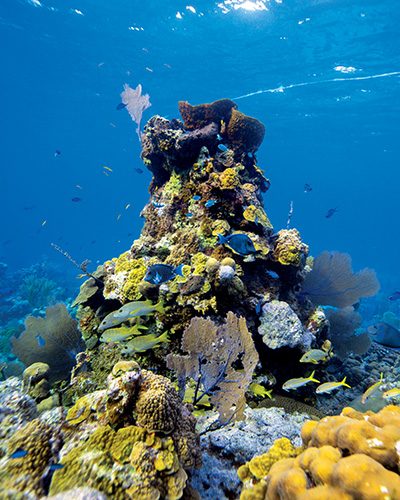
Bringing your own lights can make the full spectrum of colors visible underwater. Some photographers choose to shoot using only available light for style or economic reasons. Since red is a part of so many of the other colors of the spectrum, some photographers use a filter specifically designed to filter out blues underwater and give their images a color boost. These filters come in various strengths and will enhance reds, oranges, and yellows at any depth, bringing back some of the color spectrum as you descend.
A filter, however, will not fix all our problems. The ultimate solution to shooting ambient-light photography underwater is manually setting your camera’s white balance. You can use your camera’s white balance to shift the photo’s look so that white objects appear white again — the corollary effect being that the colors of all other objects are adjusted to that reference point. The camera will have a new baseline for the color spectrum, boosting the essential colors lost to water, such as reds, yellows, oranges, and purples.
If this is too much to think about while diving, you are in luck because our cameras have many built-in advanced features. The most important feature is the ability to shoot in a RAW photo format, allowing you to change the white balance later in photo-editing software. This flexibility will save your tropical photos from looking like you took them in a swamp and even allow you to add your own style to your images.
While many photographers rely exclusively on color correction in postproduction, I still recommend setting a good baseline white balance while you are diving. RAW photos are not lossless, so extreme changes will cause data loss in the highlights, midtones, or shadows, resulting in decreased image quality. But don’t let that stop you from experimenting with changing your white balance while editing — experiment with pushing the white balance to exaggerate the mood. Cooling down your shot can add a sense of drama, while warming it can create a more welcoming, pleasant feeling. In Adobe Lightroom, specifically with Adobe Camera RAW, it’s easy to change the white balance to another preset that works for your vision of the shot.
White Balance in Video
Making adjustments is not as simple when recording video. Many consumer cameras will not record in RAW format, which typically starts at 12-bit recording. Most cameras record video with a color depth of eight or 10 bits, creating files with colors that are harder to change while editing.
This limitation is why underwater videographers need to always consider white balance and avoid using the automatic white balance setting when recording in ambient light. Ambient light may seem constant, but the camera will continuously try to measure and readjust the white balance in automatic modes. The result will be changes in color temperature throughout your video. This applies any time you are recording video, whether topside or underwater.
When we push our camera’s white balance out of the norm, it might render natural light in the background extremely white or make the background devoid of detail or even unnaturally red when trying to make skin tones, coral, or wildlife appear normal. You will have to balance the available light, white balance, dynamic range, and the level of detail and color in your video. You can save a washed-out image, but not without some sacrifices.
Setting White Balance
Most cameras have several white balance modes, but the presets or semiautomatic modes generally are not ideal for underwater photography. The most reliable method is to use the custom white balance setting by taking a reading off a white object located in the same conditions as your subject. Every camera is different, but the methods to manually set the white balance roughly follow the same principles.
Refer to your camera’s instruction manual to access the custom white balance menu. The white object in your given lighting environment underwater will set the baseline for the rest of the color spectrum. Your white balance offsets the lost colors, bringing back what the water has filtered out.
A white object is not always readily available underwater, so many photographers carry a white balance card, which allows for a quick and easy reading of true white regardless of the environment. A set of small white balance cards with a tether to attach to your BCD or underwater camera housing is useful for divers. It’s even better if the cards can extend and retract to move out of the way and reduce drag in the water. I have used my dive buddy’s scuba tank or even the sand at the bottom to assign white balance in a pinch. Some videographers wear white fins for this purpose.
When taking a white balance reading, bring the white target roughly 3 feet away from the lens. There is a significant change in color beyond this distance, which will change the results of your camera’s reading of the environment. Next, make sure your primary light source, whether artificial or ambient, is lighting the object. Pay attention to any shadows on your subject. Your white balance reading could end up dramatically off if you take it while under the dive boat’s shadow and then swim to the reef to start shooting. You are often horizontal, and it is natural to have your camera pointed down when fumbling around with settings. Instead, keep the system level when setting your white balance.
When to Set White Balance
You have the tools and skills to set your custom white balance. The next step is figuring out when to change it. As the color-loss chart shows, whenever you change depths, your white balance changes. With that knowledge you can understand how often you must adjust your white balance throughout your dive.
While following a standard dive profile, descend to your deepest depth, set your initial white balance, and readjust your white balance as you change depths throughout the dive. A good rule is to readjust after ascending or descending 10 feet.
You may need to readjust your white balance if the ambient light changes dramatically, such as when a cloud moves in over a sunlit reef and dims the light or when you change from shooting with the sun in front of you to behind you. Paying attention to these lighting changes is important both technically and stylistically. With experience, you can start to intuitively understand those changes.
Green and blue are the only colors left past 60 feet (18 meters). Attempting to manually adjust white balance below this depth will not be effective. You will need to use artificial light.
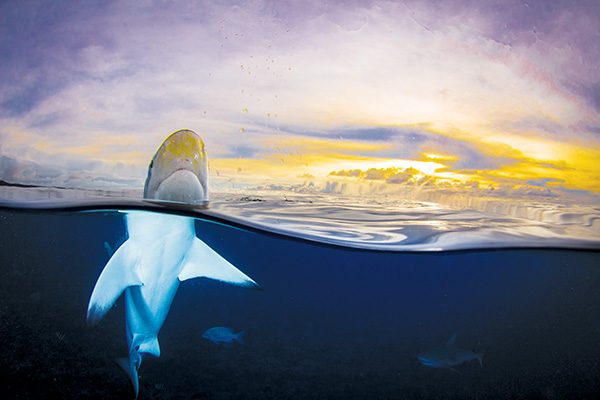
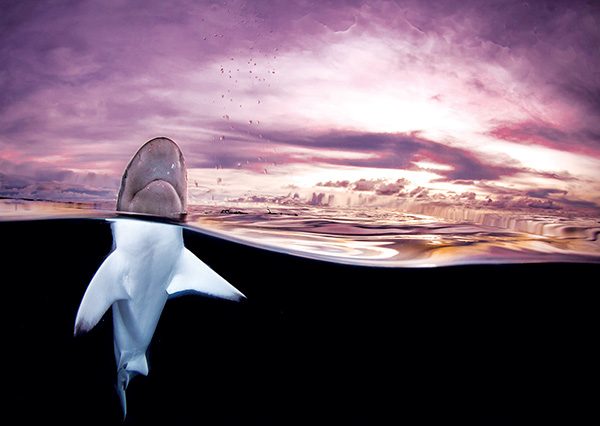
As a final note, you may need to tweak the white balance for a specific shot. Red is the first visible color lost to the water column, so our cameras are initially trying to correct the image for the loss of red. If you were to white balance just below the water’s surface and point your camera toward the sun, you would see very red-biased sun rays. If you include the sun in your shot (low-angle or over-under shots, for example), avoid an overcorrection that will unnaturally influence the sun’s color.
White balance is just one of the technical parts of capturing a great image. Learning to manipulate light, composition, and exposure variables is key to the technical and stylistic success of an underwater image for both stills and video. AD
© Alert Diver — Q4 2023