SAAT AKU MENGAPUNG DALAM KEGELAPAN YANG LEMBUT of a flooded cave, a tunnel leading away from me catches my eye. Like a mountain trail, the passageway offers spectacular views, physical challenges, and exhilaration. As I exhale into the water, I feel a dissolution of self — a sensation common among hikers, climbers, and other adventure seekers. The landscape takes over, my mind is clear, and I am at peace. My goal as a photographer is to convey that sensation in a photo. I wouldn’t say I have mastered emoting through imagery, but I think I’m getting closer with every photo I shoot.
I would characterize myself as an intuitive photographer instead of a technical one. My processes have evolved around what looks nice on my camera’s LED screen rather than what most professionals would consider a technically excellent photo. In my defense, I learned to shoot caves on the fly. I had zero knowledge of camera settings and had never used a digital camera on land. I shot my first real photographs through an underwater housing and captured my first magazine cover using the camera’s automatic settings. I learned as I went and developed methods that differ from those of trained photographers. While I shoot with manual settings these days, I have persisted in using other nonconventional (some might say incorrect) photography techniques.
But what is right and wrong in art? I shoot for myself and my personal enjoyment. If a photo elicits an emotional response when I look at it, I consider it a success — even if the edges are soft, it has a little noise, or the focus isn’t perfectly sharp. If the image shows the viewer a glimpse of my world and how I see the caves, even better. So here is how I do everything “wrong,” just how I like it.
Langkah Pertama: Hilangkan Lampu dan Strobo di Pesawat
I shoot entirely with off-board video lights. Onboard lights illuminate the foreground, which can be desirable if the photographer wants to show a feature on the floor or ceiling or brightly illuminate a model’s face and equipment.
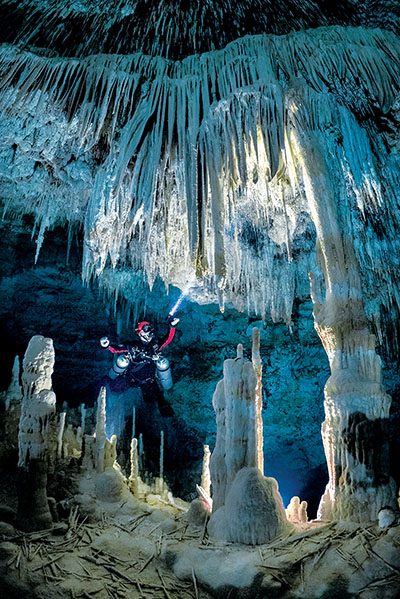
Tujuan saya dalam fotografi bukanlah potret, melainkan jenis fotografi lanskap yang menampilkan seorang penyelam untuk mendapatkan skala. Untuk menunjukkan tiga dimensi terowongan, saya memindahkan semua lampu ke depan dan menjauh dari saya, membiarkan kegelapan merayap ke tepi pemandangan dan menghasilkan sketsa yang alami. Pada dasarnya, saya menerangi gua dan model seperti sebuah set teater.
Slave sensors and strobe(s) on the photographer’s camera can trigger off-board strobes. It’s possible to use off-board strobes in much the same way as off-board video lights, but the presence of an onboard strobe illuminates the foreground in most cases, which diminishes the sense of depth and loses the delicate dance of shadows across the scene.
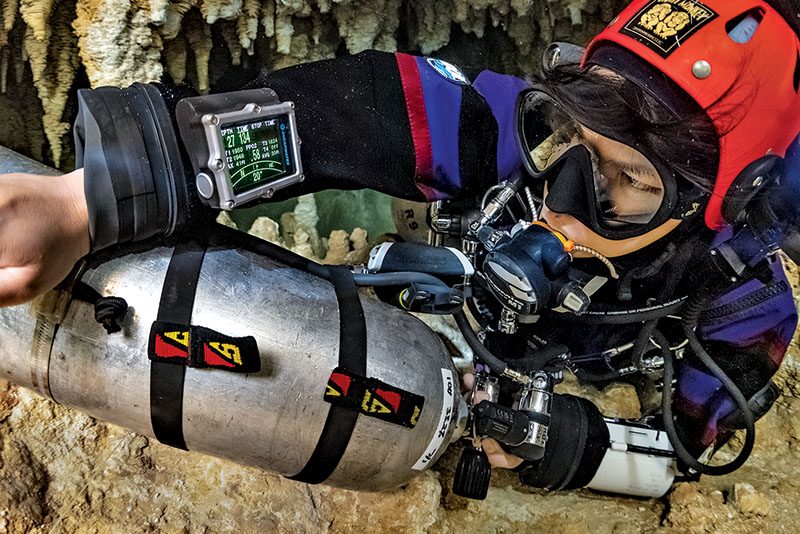
Kekurangan dari menghilangkan strobo yaitu, biasanya menghasilkan cahaya yang jauh lebih dahsyat daripada lampu video. Karena strobo hanya menyala ketika memotret, maka, biasanya lampu ini memungkinkan waktu pemotretan yang lebih lama daripada lampu video sebelum kehabisan baterai. Namun demikian, saya menggunakan lampu video Keldan 8M CRI96 8.000 lumen dan 8XR CRI86 20.000 lumen dengan remote control RC1 untuk penyempurnaan. Pengaturan ini menghasilkan pemandangan yang lebih gelap daripada saat memotret dengan lampu, yang membawa saya ke teka-teki berikutnya.
Langkah Kedua: Gunakan Kamera Rendah Cahaya dan Tekan Pengaturan
My camera is a Sony A7S III, arguably one of the better low-light cameras of its generation. The Sony A1 would probably be a step up from my camera for photography. The A7S III is a 12-megapixel full-frame camera, so what it loses in resolution, it makes up for in dynamic range — the range of tones from the lightest lights to the darkest darks. This camera allows me to capture details in the shadows and blacks, hints of textures and shapes that give a realistic and interesting level of detail to the foreground without overlighting it.
The A7S III is capable of shooting nearly noiseless images at 12,800 ISO. At 12,800 ISO, I can typically lift the exposure of RAW photos in Lightroom to +1.00 or +1.50 without any noise, and at around +2.00 I have a tiny bit of grain that doesn’t show in 11- by 17-inch prints. I have experimented with even higher ISOs and found that I can shoot up to 20,000 ISO without distracting noise, although the level of noise acceptable in a photo is probably a matter of taste. I haven’t tried many other camera brands, but I imagine that most can tolerate an ISO push beyond what most photographers shoot. I encourage cave photographers to experiment with ISOs, break the rules a bit, and see what their cameras can handle.
Shutter speed is also important. Cave photographers attempting this style of photography should minimize their shutter speed. My go-to shutter speed is 1/30 second, which may sound crazy. Yet with proper dive skills and a stable model, I get nicely focused images with no blur. Remember, I’m not chasing fish in these photos — I have good models who will stay absolutely still for as long as I require.
Terakhir, saya menggunakan Nauticam Wide Angle Conversion Port (WACP1). Port kubah yang besar dan berat ini menghasilkan gambar 130 derajat yang sangat tajam apabila dibidik dengan lensa kit Sony 28-70mm. Dengan pengaturan ini, saya secara teratur membidik pada aperture f/4 hingga f/5.6 dan mendapatkan gambar yang terfokus dengan baik dengan kesan tiga dimensi yang bagus.
This combination of settings sounds unusual to most photographers, and it’s definitely not standard. But neither is the cave environment or my lighting style. These settings combined with my camera rig allow me to eliminate strobes and move the lights away from the camera, and I like how that looks.
Langkah Ketiga: Penempatan Cahaya
A photographer’s choice of light placement is where the artistry of this style of cave photography emerges. With settings chosen to maximize exposure, I use the placement and intensity of lights to execute my vision of the cave.
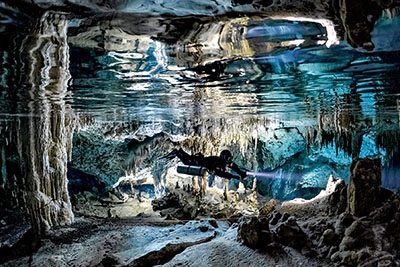
Bekerja dengan asisten pencahayaan adalah metode yang paling mudah dan paling efisien untuk pencahayaan di luar pesawat, jadi saya merekomendasikannya kepada sebagian besar fotografer gua. Menempatkan asisten pencahayaan tepat di belakang model dengan lampu video yang mengarah langsung ke kamera adalah skema klasik yang selalu memberikan hasil yang memuaskan. Hal ini menciptakan efek lingkaran cahaya yang berkilauan dan membuat gelembung-gelembung di langit-langit bersinar dan gua bercahaya. Asisten pencahayaan juga bisa mengarahkan cahaya pada model dari atas atau samping, tergantung efek yang diinginkan.
Having a lighting assistant means less task-loading than when placing lights yourself and reduces the chances of damaging the delicate cave environment. Remember that environmental impact is bad for the cave and causes silt, which destroys most images. It’s essential that the model, the lighting assistant, and the photographer all avoid causing silt, which is much harder than it seems.
The more difficult method of light placement is to set them at key points throughout the cave, which is time-consuming and can cause significant impact on the cave environment if done incorrectly. After a shoot, there should be zero evidence that a photographer was present. It’s essential to avoid leaving marks in the sediment or cracking delicate pieces of rock while placing and removing lights.
I prefer placing lights to using a lighting assistant, however, because I want total control over the scene. The drawback is that my shoots are not efficient. Most of the time my models are left floating and bored while I fastidiously move around up to nine lights. I can’t describe how I choose where to put the lights or determine the angles. Usually upon arriving at an interesting location, my brain goes wild, and I can see exactly where the lights belong. I use a combination of lights pointed at the lens, away from the camera, and perpendicular to the scene.
Saya mendorong para fotografer yang menggunakan lampu off-board untuk bereksperimen dengan efek yang berbeda, meminta asisten pencahayaan untuk mencoba sudut yang berbeda, dan bergerak di sekitar lampu (dengan mempertimbangkan konservasi) dalam satu adegan untuk melihat apa yang terlihat terbaik.
Langkah 4: Pengalaman dan Keamanan Gua
An integral part of being a successful cave photographer is surviving the experience. No one wants to have their cave photographs used in their accident analysis report, but sadly this is often the case. Until about two years ago, every Mexican cave-diving fatality I’d heard of involved cameras in some way. Cameras are distracting and task loading, and my guess is that focusing on the mechanics of taking photos led to navigational errors in most of these cases. Cave experience and safety are critical.
Sebagai seorang fotografer gua, saya akan menjadi seorang yang munafik jika mengatakan kepada orang-orang untuk tidak memotret di dalam gua. Tetapi saya memiliki lebih banyak pengalaman menyelam di gua Meksiko daripada kebanyakan penyelam gua, apalagi fotografer penyelaman gua. Saya bekerja secara profesional sebagai instruktur penyelaman gua, menyelam di gua hampir setiap hari, dan telah tinggal di Meksiko selama 17 tahun. Tanpa tingkat pengalaman tersebut, bagaimana Anda bisa dengan aman mengambil foto gua yang menakjubkan?
Kenalilah gua dan area di dalam gua yang Anda pilih untuk memotret. Penyelaman pengintaian akan memungkinkan Anda untuk mempertimbangkan bagaimana Anda akan menerangi pemandangan dan memposisikan model Anda. Anda dapat memberikan pengarahan singkat sebelum menyelam dan bahkan membuat diagram ide Anda untuk membuat pemotretan menjadi efektif dan efisien. Keakraban dengan lokasi pemotretan juga sangat penting jika Anda mengalami kebingungan selama pemotretan. Semua penyelam dalam tim harus dapat mengenali di mana mereka berada dan memahami cara keluar kapan saja selama penyelaman.
Bring a safety diver on your shoots, especially if you are not a full-time cave diver. Of course, you should regularly check your breathing gas, maintain your sense of awareness and direction relative to the line, and keep an eye on the environment to avoid breaking delicate formations or marring the sediment. But everyone can make mistakes, and it’s helpful to have a diver whose sole responsibility is ensuring that the photographer and the model stay safe and don’t damage the environment.
Ingatlah bahwa protokol dan teknik penyelaman gua adalah yang utama. Membawa alat yang sarat dengan tugas dan mengganggu ke dalam gua tidak dibenarkan untuk melanggar protokol standar penyelaman gua. Penyelam harus lebih lanjut ketat tentang keamanan gua saat memotret, tidak kurang dari itu. Fotografi tidak membenarkan melanggar visual dengan panduan, menyelam melewati tekanan giliran Anda, atau gagal menempatkan panduan sama sekali.
In addition to observing all these standard safety protocols, I always place a personal marker on the cave line indicating the exit direction to reduce the chance of disorientation. Much to the dismay of some magazine editors, I try to keep the cave line in all my photographs and refuse to edit it out — I always want to show safe cave-diving practices.
Jalankan Visi Unik Anda
Gua-gua di Meksiko merupakan keajaiban fotografi yang dipenuhi dengan air yang sangat jernih dan penuh dengan formasi yang halus. Tanpa cahaya alami, fotografer memiliki kendali kreatif yang tidak terbatas. Untuk menghasilkan foto gua yang emosional dan memikat, dibutuhkan kreativitas dan fleksibilitas, apa pun metode Anda.
Belajar memotret lingkungan yang menantang ini bisa membuat frustasi, tetapi upaya ini dibenarkan ketika Anda dapat mencurahkan isi hati Anda melalui lensa Anda dan membuat orang lain melihat visi Anda yang unik tentang dunia. AD
© Alert Diver - Q2 2023