Imagine seeing a shipwreck in its entirety, fully detailed with artifacts in place and exactly how it sits on the bottom. Now imagine doing that from home before you dive and sharing your favorite dive site with nondiving friends or even taking them on a virtual dive. All this is possible through photogrammetry.
Photogrammetry is the process of collecting a series of still images or videos of an object, such as a shipwreck, and then loading those images into software that can triangulate the photographed points to create a 3D model. Plenty of real-world applications can use this technology, including architecture, engineering, forensics, archaeology, mapping and video games. I enjoy seeing wrecks come to life in a way that a single photo could never accomplish.
I like using technology and pushing myself to experiment and try new techniques underwater. Photogrammetry is something I had wanted to learn for years. In April 2020 I began learning how to scan objects and use the Agisoft Metashape software through the mentorship of my good friend Marcus Blatchford. I started by scanning objects around my home with only 15 to 50 images to learn the software and photographic procedures on land before attempting to capture underwater subjects.
Next I went to a quarry to try my new skills and experiment with different lighting techniques from natural light, video lights and strobes in both good and poor visibility. To help perfect my technique I scanned planes, trucks, cranes, a bus and some cars and then took it a step further and began shooting inside these small wrecks. I left for the Great Lakes to scan my first shipwrecks, including the brig Sandusky, the Maitland et le Joseph S. Fay. The satisfying results gave me the photogrammetry bug and inspired me to make models of more wrecks, including some at deeper sites.

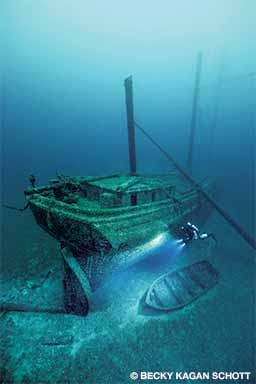
One of my favorite shipwrecks in the Great Lakes is the Cornelia B. Windiate, located in 185 feet of water in Lake Huron. It disappeared in 1875 with its entire crew of nine people. I knew this intact wreck would make an interesting visual as a 3D model. Among the challenges were the depth, limited bottom time at 185 feet, chilly 38°F water and not knowing what the visibility and ambient light would be like once we got there. I thought about the final challenge for a year: how to capture the three standing masts. Circling all three masts to get the necessary coverage would be one of the biggest issues, but I had a plan, and you never know if you don’t try.
I envisioned the dive in my mind over and over for months. Using my rebreather and trimix would give me about 35 minutes to try to capture the 139-foot-long ship. Having a safety diver swim behind me to watch in case there were any emergencies would allow me to focus on my rebreather and capture the necessary images while knowing I have someone reliable with me if I needed assistance.
My camera was ready when we dropped down to the wreck, and I was happy we had some ambient light that day. I still used my Light & Motion video lights to help illuminate the ship for color because everything is very dark and blue-gray at that depth. I started my shoot at the stern near the yawl boat to make sure I completely covered that, and then I began to swim along the bottom of the hull, listening to the rhythm of my interval timer snapping away. As we swam, I made sure to overlap each image by 50 to 80 percent, which is critically important. By the time we finished the first pass, we were right on schedule.
The next pass was around the gunwale, shooting downward at a 45-degree angle to cover the bow anchors, broken bowsprit, stern cabin, deadeyes and wheel. The last pass was about 8 feet above the deck, aiming straight down in each direction to capture the final details. Each time we swam by a mast, I made a point to shoot all the way around and circle up it as much as possible. They stand at least 30 feet tall, so doing another higher pass wasn’t an option. At the end of the dive, I spent a little more time going around the wheel and masts to make sure I had entirely covered them. After 37 minutes of bottom time, we had 60 minutes of decompression, so it was time to say goodbye to the Windiate.
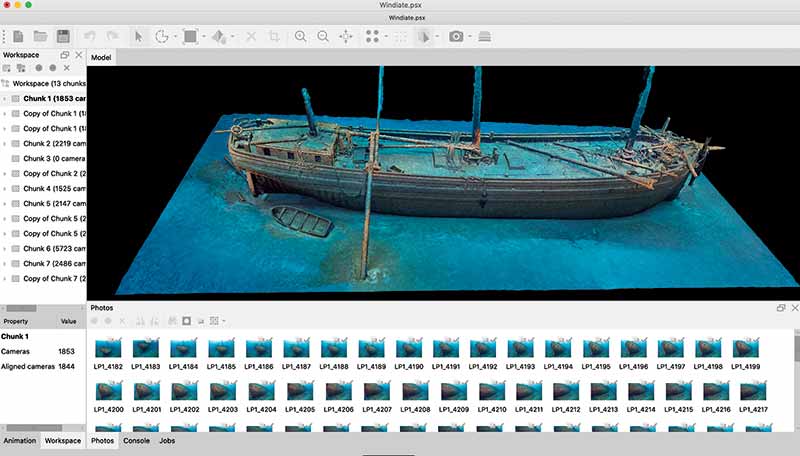
That night I downloaded and processed the 1,844 images and imported them to Agisoft to start the model. It takes hours to align the images, but once they are aligned you can see what’s called a point cloud, which is the first attempt at a 3D rendering of the photos together. You should have something that looks like a shipwreck, which means the coverage was good. If all the photos align well, you have more points and detail.
I immediately saw that the masts were there, but I didn’t want to get too excited until I completed the next processing step: creating a dense cloud. The dense cloud can take more than 12 hours depending on the photo quality and your computer’s processing power. After that step it can take another day to process the model’s mesh and texture. It can be three or more days after the dive before you see the finished product.
The process doesn’t always go smoothly, and there can be a huge learning curve from collecting the images to processing them. The processing stage is different from when I typically do postprocessing on an image — I white-balance and then bump the shadows and lower the highlights. The images end up looking quite flat and nothing like what you’d expect from normal photographs. You don’t need the images to look perfect; you need the software to be able to match the points, so the images can’t be too under- or overexposed.

I couldn’t have been happier when I saw the finished model and realized that my attempt at covering the entire wreck, including the masts, showed that I successfully overcame the many challenges. Accomplishing the dive encompassed years of technical diving, coldwater, rebreather and mixed-gas experience as well as my significant time spent underwater with a camera.
It’s exciting to produce something that allows divers and nondivers to do a virtual dive on the wreck. You can explore it with virtual-reality goggles or on your phone, tablet or laptop to see the wreck in its entirety, including details such as how the rudder is suspended over the bottom. Researchers and others can use photogrammetry to monitor shipwrecks over time to see changes. Sometimes studying the models can even lead to discoveries.
I can now hold a 3D printed replica of the Cornelia B. Windiate in my hands. My husband, David, has been working with me to print the models at home. This process can take another three to four days and has its own learning curve and list of challenges. He’s used different materials and bed temperatures and has tried various sizes and supports for parts such as the long bowsprit.
Progressing from diving on the Windiate in the cold, eerie depths to creating the photogrammetry model and holding a physical replica is gratifying work. Having a realistic and tangible way to interact with a wreck is an amazing way to bring shipwrecks to life and share their stories with everyone.
To view the finished Cornelia B. Windiate model and others, visit https://skfb.ly/opyqW et https://sketchfab.com/BeckyKaganSchott.
© Alert Diver — Q3/Q4 2021