OUR UNDERWATER WORLD IS FULL OF VIBRANT COLORS, interesting patterns and textures, and fascinating creatures. It’s a wild place that is unpredictable and simultaneously harsh and harmonious. Taking a camera into that world allows us to record snippets of beauty in ways that help us tell various stories. Learning to use your camera effectively takes practice, a keen understanding of the fundamentals, and incorporating the natural elements that surround you underwater.
Knowing how to utilize a black background, a blue background, and one that uses bokeh effectively are foundational skills that everyone should understand. Learning these three techniques will help you approach your next macro dive differently.
In recent years black backgrounds created with snoots have dominated the macro world, but many shooters have begun to rebel. A new trend is starting — backgrounds that are anything but black.
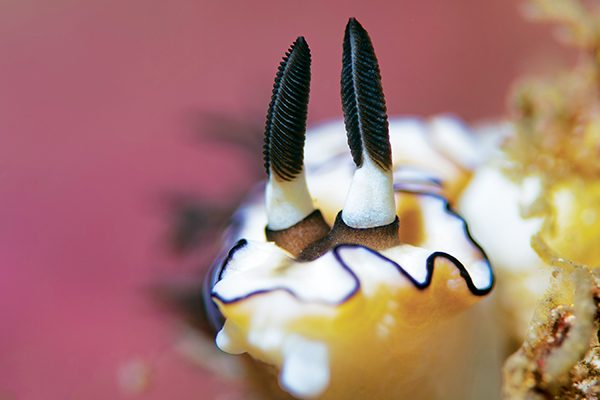
If your subject is black or has darker features, brightly exposing the colorful background will help the details stand out.
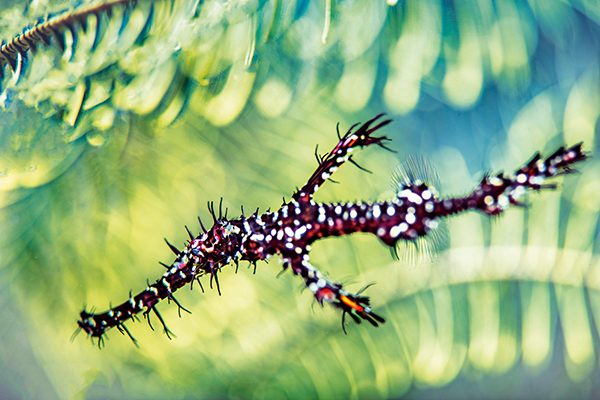
Watching for patterns in nature and using them to create exciting designs can result in punchy, dramatic compositions.
Macro photography is a skill that is primarily about making portraits of creatures in their habitats. This method typically uses low ISO, fast shutter speeds, and small apertures to create the greatest possible depth of field. While this formula might work well when we want to include the critter’s surroundings, we need to remind ourselves that the aperture is there for a reason and using it properly can change the entire outcome of a scenario.
Fortunately, I asked someone for help when I first started underwater photography. This mentor made sure that I understood the basics and the reasons for them. When I would proudly show him my recent images, he would say, “Hiding things in the dark is easy,” and ask me what I could have done differently. His tough love always forced me to work a little harder and try something different, hoping to redeem myself at our next meeting. Years later, I look back with gratitude, knowing that he helped me build a strong foundation of fundamental skills that I use nearly every day.
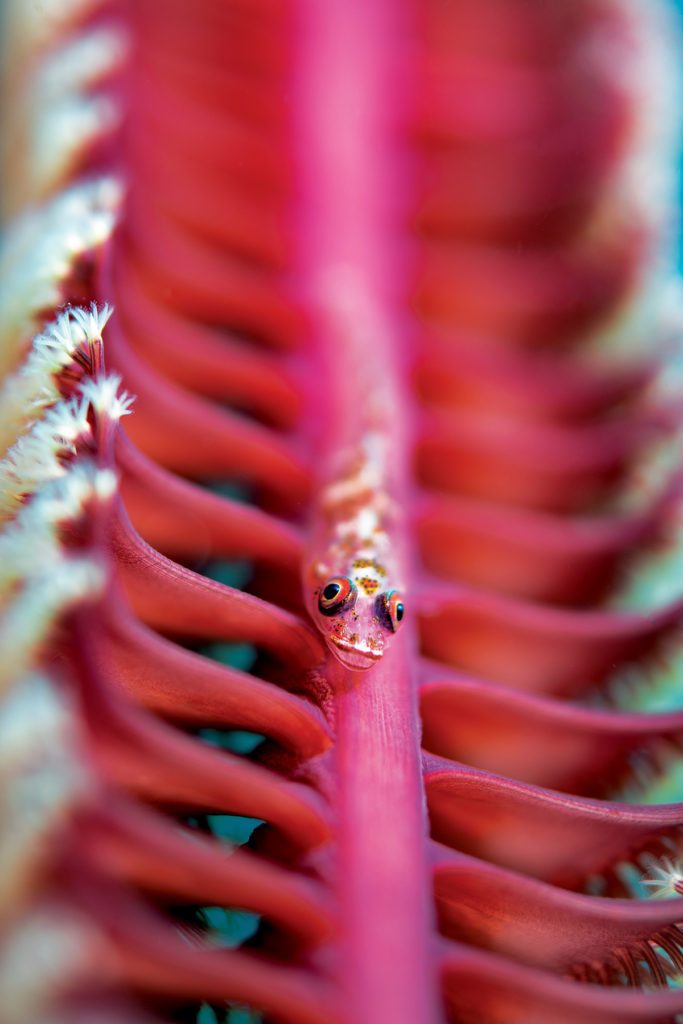
The snowy pastel colorations of a wide-open aperture begin happening around f/5 and wider. Whip coral gobies are perfect for wide-angle macro settings and a slow shutter speed (1/125 second) for more ambient light. Your strobe keeps the image sharp, and the open aperture does the rest.
BRIGHT BLUE BACKGROUNDS
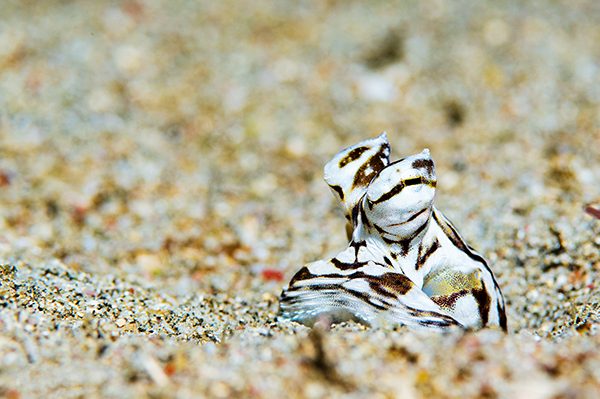
Equally important as learning to use a black background is how to keep the entire frame — the background and the foreground — lit. Negative space is always a primary factor in photography, but not all negative space needs to be black. Hunting macro critters can take us across many different types of terrain — some are sandy and silty, some dive sites are littered with objects, and others are colorful and full of random textures. Instead of leaving out these interesting features, we can incorporate them into the image in a way that can enhance it. We can create bold and bright negative space that utilizes our underwater world’s natural colors and designs.
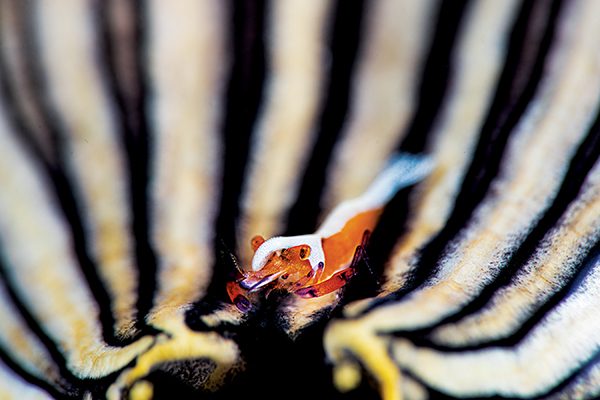
To compose bright macro images, watch for colorful tunicates, sponges, coral heads, or anemones, and consider natural elements such as sunlight and blue water. Instead of fighting to keep out the sunlight, invite it into the frame by opening your aperture and slowing your shutter speed. Macro with a blue background is uncommon but something you can achieve with a few quick adjustments to your settings and an upward angle toward the sunshine and blue water. By slowing the shutter speed, you will allow more light to enter the back of the frame. Opening the aperture will help fine-tune your exposures. You can start with ISO 160, f/11, and 1/125 second or slightly slower and adjust from there. This technique is highly effective for whip coral gobies or anything else that allows you to shoot on an upward angle with settings similar to wide-angle. Get low, get close, and aim up. Look for photo opportunities with only blue water behind your subject, and then stick with that subject and practice.
Get a fascinating peep inside a green tunicate by lighting it with a flash or powerful flashlight and adjusting to a higher ISO with an open aperture.
BOKEH BREAKDOWN
Bokeh is another simple tool that is often overlooked. Bokeh is an image’s out-of-focus portions in front of and behind the subject. It creates dimension and is a function of the lens, but your aperture’s setting or your nearness determines the effect. All photographers should learn to effectively use two basic types of bokeh: practical bokeh and intentional bokeh. You can use bokeh practically or deliberately exaggerate it to create more blur or detail as desired. You can also use your aperture to fine-tune exposures.
Practical bokeh separates your subject from the background, especially when shooting in a featureless environment such as sand flats or rubble patches or when the background is too busy. There are two ways to create the blur: using an open aperture between f/9 and f/11 or getting closer to your subject. Your distance to the focal point also affects your depth of field. The focal plane pinches and narrows as you approach your subject, blurring the background while maintaining the same aperture. The opposite occurs when backing away from your focal point, which increases the depth of field and widens your focal plane.
BOKEH HOW-TO
Your aperture’s function can be slightly abstract and difficult to understand on paper. It’s much easier to grasp by creating a visual reference, which you can do on your kitchen table or before you’re at the next dive site.
Find a subject that you can approach closely, get low, and be sure there is a bit of substrate on either side of your subject. Frame your subject slightly off-center and adjust to f/9. Take a series of images while adjusting your aperture size up and then down. You will see the focal plane expand as you close your aperture (smaller number) and contract as you open it (larger number). Think of this as an inverse relationship. The texture of small particles becomes more granular at higher apertures and blurs at lower apertures, while the light becomes brighter and darker, respectively. Using the same focal point, get closer and farther from your subject without changing the aperture. This five-minute exercise will cut five years of hard lessons from the learning curve and is well worth the investment.
What to look for in the results are smooth, out-of-focus grains of sand with a distinct focal plane running horizontally across your frame. Learning this simple procedure allows you to create interesting compositions by using your aperture to create practical bokeh. Managing proper exposures is your next challenge, so try changing the incoming light using your camera’s tools (ISO and aperture) before reaching for the strobe power.
The more you open your aperture (moving to a smaller number), the lower the ISO you need to balance brightness and the high point. Try to keep the background bright while maintaining proper exposure in the foreground. When using two strobes, keep them at 10 o’clock and 2 o’clock, and keep the shadows under your subject.
Here are some basic setting combinations to create bokeh:
- Slightly blur the background for a great practical bokeh with 1/250 second, f/11, and ISO 160.
- Make the background start to bubble for an interesting bokeh with 1/250 second, f/9, and ISO 100.
- Create an intentional, artistic bokeh with 1/250 second, f/7.1, and ISO 100.
- Compose completely out-of-focus bokeh with pastels and colorful splotches with 1/250 second, f/5.6, and ISO 100 or expanded low ISO if possible.
Intentional bokeh begins to push into a more artistic, creative range. A large aperture gives your image a creamy, sometimes snowy feel as the background starts to blend heavily with the foreground. Focus on a sharp focal point to anchor the image and secure the viewer’s eye. In this larger aperture range (smaller numbers), unusual things happen. Dots, spots, and lines begin to lift away, bubbles form in the background, and even backscatter can take on exciting designs. These effects are all possible while making minor adjustments to your camera, even as you learn the fundamentals of creating different bokeh forms.
A black harlequin ghost pipefish hiding in a yellow hydroid made an ideal subject for a shallow depth of field.
Opening the aperture as much as possible will create images that push the boundaries of what is acceptable. Shooting in this manner is extremely difficult to do well due to the amount of incoming light. Below f/5.6, background tunicates, sponge-encrusted stones, and seagrass become dabs of pastel colors, and bubbles begin to emerge from reflective sand. Sharp leading edges become more challenging to achieve as the depth of field is nearly nonexistent. Even with that challenge, a well-executed image using a wide-open aperture can enhance the artistry of your photos. Your images will be designed by nature, painted with light, crafted through mechanics, and filtered through your mind.
Every macro photographer should know and understand the fundamentals, whether using practical bokeh to properly isolate a subject or intentionally exaggerated bokeh that pushes the boundaries of creativity, creating blue backgrounds, or even filling the frame.
As you begin planning your next dive trip, pull out your camera, refamiliarize yourself with it, and practice these essential skills well ahead of time. Soon you will find yourself using your camera like a well-tuned instrument to take your backgrounds beyond black. AD
© Alert Diver — Q3 2022