In the 1860s, Samuel Plimsoll was a member of the British Parliament who was concerned about properly marking ships to show where their hulls should cut through water so they would not sit too low. His goal was to decrease the number of ships lost from overloading. While the concept of marking load lines on ships dates back to at least the Middle Ages and likely earlier, Plimsoll is credited with initiating the movement that ultimately led to the system of calculating and marking ship load lines now used in commercial shipping. These load lines are called Plimsoll marks or Plimsoll lines in his honor.
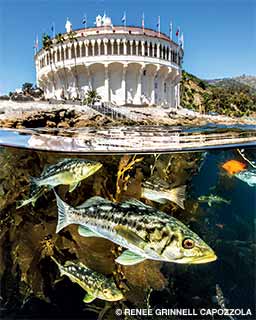
Underwater photographers sometimes refer to the narrow water zone where a subject splits the surface as the Plimsoll interface. Opportunities abound here for dynamic shots achieved by angling the camera above or below the waterline. The dedicated and creative underwater photographer can capture traditional over-under split shots with a standard straight meniscus and dramatic reflections from below of the subject, the sunlight or both as part of a modified split shot or a fully underwater picture.
Shooting in the Plimsoll interface also allows the photographer to work in high ambient light or shoot through Snell’s window — a cone of light that is seen when looking up near the surface — without donning a scuba tank since these are shots done at the surface. For these reasons, mastering techniques at the Plimsoll interface is a worthwhile endeavor for any serious underwater photographer.
Finding Subjects in the Plimsoll Interface
The most obvious consideration for shooting at the surface is locating a good subject. Reliable subjects include turtles, dolphins, whales, mantas, sharks, rays, whale sharks, reef fish and any other animal that comes close to the surface. Shallow lagoons or coral reefs are often excellent locations. Animals that come up to breathe, such as whales, dolphins and turtles, add some predictability since you can estimate their next breath and anticipate when and where they will surface.
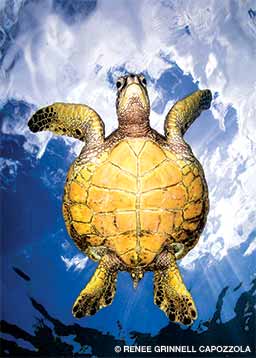
A turtle resting in a coral bed, for example, will usually need to surface and breathe sometime in the next 15 to 20 minutes. You can use that time to plan the shot — your position relative to the sun, the above-water background, other site-specific circumstances and your camera settings. When the turtle finally surfaces, prepared photographers may capture the shot they envisioned.
Once the subject is within the Plimsoll interface and in shooting range, it is important to remember that you may have limited time. It is critical to move patiently and time the encounter at the peak moment of surface interaction. Turtles, for example, will usually poke their heads above the water to breathe and then dip under to look around before making two to four more head raises to breathe. You might scare away a turtle if you photograph it during its first head lift. It’s better to slowly approach the turtle, wait for its first breath and then take your shots on its second or third head lift.
For larger animals such as whales, it can be helpful to wait to hit your shutter until the exact moment they hit the surface. With these types of encounters, guides often have photographers get in the water when the mother and calf are resting below. When the calf starts to surface, you can watch where it is going and try to be just in front of where it will likely emerge so you can photograph the animal coming toward the camera. Experienced guides are usually skilled at instructing photographers where to safely wait for the whales to surface. A conscientious photographer will never chase the whales — they may be scared away, plus they swim much faster than any human. It is better to be patient and let the whales approach on their own.
When shooting faster and more agile marine life such as dolphins and sharks while using only available light, it can be useful to shoot on a high shutter-speed-priority setting. Doing so will freeze the action, since you won’t know in advance where the sun will be relative to the subject, which affects the aperture setting.
Locations for reliable encounters with worthy subjects in the Plimsoll interface include the Hawaiian Islands and Bunaken (North Sulawesi, Indonesia) for turtles, Kona and the Maldives for mantas, Kona and Bimini for dolphins, Moorea and Tonga for humpback whales, French Polynesia and the Bahamas for sharks, French Polynesia and the Cayman Islands for stingrays, and Isla Mujeres and the Philippines for whale sharks.
Quick Tips for Terrific Splits
Split-level shots, also called over-unders, show above and below the waterline and fully use the Plimsoll interface. These shots allow the viewer to simultaneously see two worlds in a photograph through the dome port in a way impossible to replicate with the naked eye.
To capture effective splits during the daytime, you ideally want abundant ambient light, clear water, and the sun behind or directly above the camera — midday offers the best conditions. Shooting early in the morning and at sunset will require the addition of strobe light.
The bigger the equipment, the better — an 8- to 9-inch-diameter dome should be sufficient in most cases. The bigger the dome, the more surface area you’ll have and the thinner the waterline or meniscus, which looks better in the picture. You need a wide-angle lens, either fisheye or rectilinear based on your personal preference. Using a smaller aperture (higher numbers such as f/16 or f/22) is key for focusing both topside and underwater subjects, which keeps both the foreground and background subjects sharp.
The most common difficulty with splits is avoiding the water droplets that can settle on the dome and obscure pictures. To minimize these, I prefer using a glass dome rather than acrylic, and I sometimes apply a mask defogger to the outside of the dome.
How to Play the Reflections
Incorporating reflections enhances pictures by adding another creative layer. You can produce reflections with split shots or images strictly under the surface, but ultra-calm water is necessary for both techniques.
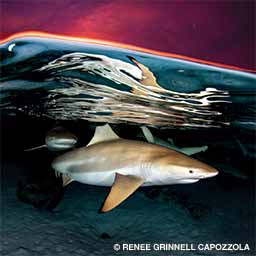
To incorporate a reflection into an over-under, the reflection should be just under the waterline or on top of the water’s surface. To get the reflection to appear under the waterline, slightly angle the camera’s housing up toward the surface while still having the upper part of the dome above the surface. Conversely, to get a reflection on top of the water, slightly angle the camera’s housing downward, being careful not to cut off the underwater portion of the image. This camera angling takes a little practice until the technique becomes intuitive.
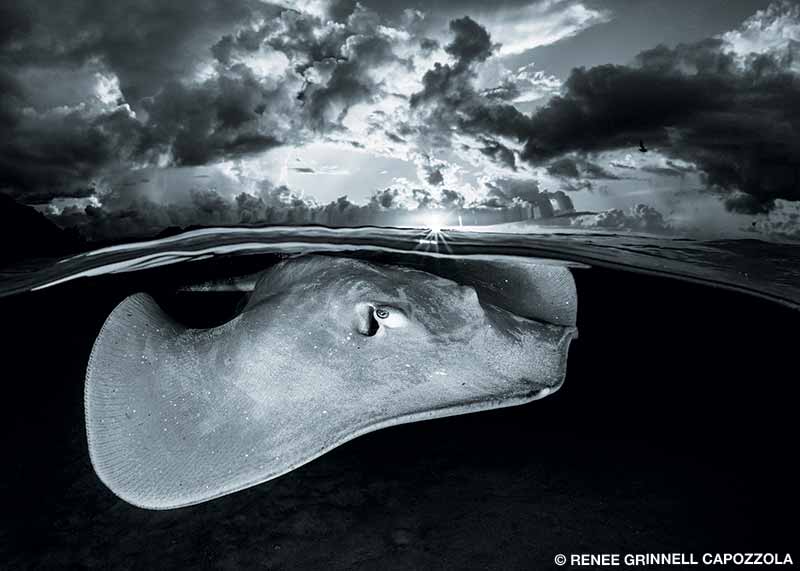
For a strictly underwater shot, place the camera’s housing just under the surface and angle the port at about 30 to 45 degrees. Using a flash will enhance the reflection, especially in low-light situations such as sunrise or sunset.
Using a narrow aperture such as f/14 through f/20 produces excellent results for most reflection shots and helps avoid overexposing the image, especially when aiming the camera up toward the sky.
Incorporating Snell’s Window
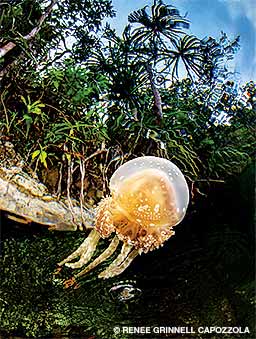
One of the most interesting surface shot techniques incorporates Snell’s window, which is caused by the refraction of light entering the water. Snell’s window allows the underwater viewer to see what is above the surface through a cone of light about 96 degrees wide. This practice requires using a wide-angle lens; a fisheye lens offers the most surface area and a circular effect.
To use this phenomenon, the photographer must be just under the surface and aim the camera’s housing upward. The more you angle the camera, the more surface area of the sky — or what’s above — you will incorporate into the picture. Use a narrow aperture and decrease the ISO when you point the lens toward an extremely bright sky. You can achieve these shots at any time of day, but incorporating a flash with low light will make the subject pop. Mangroves and shallow lagoons are excellent places to experiment with Snell’s window.
Blending Strobe Light with Ambient Light
Another challenge in wide-angle underwater photography is combining artificial strobe light with natural ambient light so that the final product still looks natural.
For day shots, strobes dialed down to lower power will provide rapid recycling and give the foreground subject some pop while not overexposing the frame. Incorporating some fill with a flash in over-unders, reflections and Snell’s window shots will also give the subject more clarity.
For sunrise or sunset shots, it is often necessary to increase the power of the strobes to adequately light the subject. Depending on how close and reflective the subject is and how much ambient light is available, you can try 50 to 75 to 100 percent power in that order. When it seems like there is the right amount of light, checking the histogram ensures accuracy.
Focusing Tips
Since many Plimsoll interface shots involve a moving subject at the surface, use continuous focusing mode, also known as AI Servo AF or AF-C. In this mode, the camera will continue to focus on a moving animal if you hold the shutter-release button pressed halfway after the camera focuses. You can also use back-button focus, which you can program into most cameras to assign the focus to a button separate from the shutter release, allowing the photographer to quickly take a picture and not have the camera pause while trying to refocus.
Deciding where to put the focus point can be troublesome, especially for newer photographers. Choosing a specific focus point matters less, however, when using a narrow aperture and extremely wide-angle lenses. A smaller aperture produces shots with a higher depth of field, which means more of the scene is in focus, so staying between f/14 and f/22 will provide some latitude.
For split shots, put the focus point on the underwater subject (at the bottom of the selection frame). You can move that focus point to the above-water portion of the image if the main subject is above water or you want to emphasize a portion of that animal above water, such as a turtle’s head. With a narrow aperture and super-wide lenses, however, the difference in focus area is modest.
Some cameras may have difficulty focusing on a quickly moving subject that is simultaneously above and below the water, regardless of where you place your focus point. Taking multiple shots or enabling rapid firing will increase the chances that you will get some images
you like.
Postprocessing Tips
Even the best underwater photographers use postprocessing tools such as Adobe Lightroom or Photoshop to polish their finished products. For over-unders, two of the most helpful tools are the spot removal tool to remove water droplets and the graduated filter.
The underwater portion of the image will always be darker than the topside portion due to water absorbing more light than air does. As the sun dips lower in the sky, more light reflects off the surface, so early-morning and late-afternoon light will have greater exposure differentials. The graduated filter and adjustment brush can brighten dark areas and darken the relatively overexposed ones. When you lose detail to significant overexposure, however, no postprocessing tool can bring it back.
For Snell’s window shots, it can also be useful to decrease the highlights in the sky. For reflections, you can often improve your pictures by using the dehaze slider to minimize any overexposed areas and increase the contrast and clarity of the reflections.
These final adjustments can provide the elegant finishing touches to refine pictures taken within the Plimsoll interface.
© Alert Diver — Q3/Q4 2021