Mistake #5: Diving Beyond Your Training

Never stop developing your diving abilities. There is always more to learn—how to dive new environments, how to refine your skills or even how to use new types of equipment. No matter where your diving adventures take you, make sure you are equipped with the proper training.

Remember:

  • Your certification only qualifies you for the same diving conditions and the environment in which you were trained.
  • As you continue your training, slowly extend your diving experiences. California shore diving presents different challenges than Caribbean boat diving—make sure you’re prepared for each new diving environment.
  • Take it easy, and if you’re not having fun or if you don’t feel good about the dive, don’t do it. This is especially important when diving in new conditions such as cold water or limited visibility or when using new equipment.
  • If you feel uncomfortable about a dive, it may because you feel that you’re not ready. Remember, dive your experience, not your “C” card.
  • If you want to begin exploring new environments, seek the proper training that will prepare you to explore them safely. For instance, if you want to explore the interiors of shipwrecks or enter a cave, enroll in a Wreck Diving or Cave Diving course. These unique overhead environments present specific challenges that can be deadly if you are not trained to manage them.

Don’t neglect first aid training. In the case of an emergency, you will not regret taking a course that requires a few hours of your time.

There are all kinds of specialty dive courses that can prepare you to explore safely. If you want to expand your diving experiences, sign up for a course to get the training you need…

  • wreck
  • deep
  • cavern
  • drysuit
  • cave
  • ice
  • drift
  • altitude
  • night

Next: Mistake #6 – Running Out of Air >

Mistake #6: Running Out of Air

Running out of air is the most common trigger for diving accidents. It seems like a no-brainer, but several factors can affect consumption rate. Be air aware: Monitor your air supply.

  • Incorporate gas supply into your dive planning. You can only stay under as long as you have enough gas remaining for a safe ascent. Don’t forget to save some gas for flotation. Good rules of thumb for turnaround limits are when you have used:
  • Check your gauge regularly.
  • Be aware that exertion, like when swimming in strong currents and depth will affect your air consumption.
  • Anxiety or stress can also affect air consumption. Try to maintain normal breathing, but if you do feel anxious, keep a closer eye on your gas supplies; it may dwindle more rapidly than usual.
  • Running out of air is an easily avoidable mistake that carries serious repercussions.

Next: Mistake #7 – Not Taking Personal Responsibility >

Mistake #7: Not Taking Personal Responsibility

blank

Each diver in the dive group shares equal responsibility for the conduct of the dive. When all divers understand and agree with that premise, the dive group can protect itself from individual and collective harm.

Know your personal limits and take time to examine and evaluate your dive habits.

Don’t rely on the experience of other divers in the group. As a certified diver, you are expected to recognize when elements are outside your level of training or comfort zone; it is your responsibility to acknowledge that and voice it.

Always remember, anyone can call off a dive at any time. In other words, it’s always OK to say “No.”

DIVE SAFETY STARTS WITH YOU.

13 Ways to Run Out of Air & How Not To

blank

DAN’s Smart Guide to Air Consumption

Our self-contained underwater breathing apparatuses are only useful as long as the tank contains sufficient breathing gas. Scuba equipment allows us to breathe underwater, extending our ability to explore. Without breathing gas, our time is limited by the dangers of asphyxia and drowning.

During dive training you learned how to:

  • Understand breathing gas needs
  • Calculate the limits of available gas
  • Monitor the remaining gas pressure
  • Return to the surface in a timely manner with enough gas to inflate your BCD

Even so, running out of breathing gas is the most common dive incident and the number one cause of diving fatalities. Even the most skilled divers can make mistakes and run out of gas. In this guide, we’ll cover the 13 most common errors that lead to out-of-air emergencies and how to avoid these situations.

The Most Common Causes of Out-of-Air Emergencies

blank

Lack of Awareness

1. Diving too Deep

Gas consumption increases dramatically with depth. Your decompression obligation builds quickly, and you may need more gas for decompression stops. An Aluminum 80 is not meant for deco dives. Running out of gas at depth puts you at risk of a long, hazardous emergency ascent. You can maximize your time at shallower depths and easily reach the surface in the event of an emergency.

2. Staying Too Long

Sooner or later you will consume your gas reserves. Determine in advance the tank pressure at which you will need to turn back and start your ascent. During the dive, actively monitor your tank pressure and turn back on time.

3. Working too Hard

Fighting a strong current, hunting or lacking buoyancy control can affect air consumption. Exertion at depth may speed up depletion of your tank up to twenty times. If you are not accustomed to diving in strong currents or surf, seek training prior to diving in these environments.

4. Not Monitoring Your Pressure Gauge

Be air aware: Monitor your air supply. Check your pressure gauge regularly and communicate your supplies with your buddy.

5. Ignoring Anxiety as a Factor

Anxiety changes all calculations and may deplete tank reserves faster than vigorous exercise. Try to maintain normal breathing, but if you do feel anxious, keep a closer eye on your gas supplies; it may dwindle more rapidly than usual.

Procedural Problems

6. Starting With Less Than a Full Tank

Regardless of how short an immersion you may contemplate, do not start your dive on less than a full tank. Never descend to retrieve a lost piece of equipment or anchor if the tank is nearly empty.

7. Not Opening the Tank Valve All the Way

Open the tank valve all the way and check that breathing through the regulator does not cause the pressure indicator to swing with each breath

8. Frequent Depth Changes and BCD Adjustments

Yo-yo diving, or using your BCD frequently to move up and down in the water column, can quickly deplete your gas supply. Yo-yo diving also increases risk of pulmonary barotrauma and decompression sickness.

9. Omitting Predive Check and Buddy Checks

Use a printed predive checklist to prevent mental lapses—the mental checklist is an oxymoron.

Equipment Issues

10. Regulator

Your gas consumption can be affected if:

  • Your regulator is hard to breathe from.
  • Your regulator starts to free-flow due to freezing or debris.
  • Your dive buddy accidentally knocks your regulator out of your mouth.
  • Your secondary regulator has a slow leak.
  • Your mouthpiece decouples from your regulator.

Take preventive steps:

  • Rinse your regulator after diving.
  • Conduct regular maintenance on your regulator and have all parts replaced that may have been worn off or are out of date.
  • Secure your spare regulator—don’t let it drag on the bottom.

If your regulator starts to free flow, attempt to flush it; this may help if debris is to blame. Remember, you can still breathe from a free-flowing regulator, but the gas will not last long, so you have to initiate the ascent.

11. BCD

Inflator leaks or tears in your BCD can deplete your air. Rinse your BCD after diving and conduct regular maintenance to prevent leaks.

12. Pressure Gauge

If your pressure gauge is integrated with your computer, a computer error may also affect the gauge. If your tank pressure does not decrease with time of dive, you have a problem and should safely terminate the dive. Make sure that your gauge is calibrated properly. Some gauges will not indicate zero, even when the tank is empty. To avoid this problem, make sure you return to the surface with the gauge indicating 500 psi or greater.

13. Burst O-ring or Hose

O-rings should be replaced regularly. Carry your own with you, and if you have a minor leak, replace the O-ring in question. Do not open your regulator on your own; this should only be done by a certified maintenance professional.

blank

Next: Safety Tips to Prevent Out-of-Air Emergencies>

How Much Air Do You Really Need?

blank

Understanding Breathing Gas Needs

Your breathing rate depends on your level of exercise and depth. The higher your level of exercise, the more oxygen you need and the more CO2 you will produce. In order to flush the CO2 from your lungs while diving, you must inhale breathing gas. The chart below shows the relationship between depth, pressure, exercise and breathing gas requirements. The deeper the depth and the higher the level of exercise, the greater the demand for breathing gas.

Breathing Gas Needs: How Much Air is Required to Ventilate Lungs?

Depth (Feet)

Environmental Pressure
(Atmospheres)

Breathing gas Needs (Liters per minute)

At rest

Light to moderate activity

Vigorous exercise

0 feet (Surface)

1 ATM

8 lpm

20 lpm

70 lpm

30 feet

2 ATM

16 lpm

40 lpm

140 lpm

100 feet

4 ATM

32 lpm

80 lpm

280 lpm

By the Numbers

The Aluminum 80 is the most commonly used tank.

Specifications:

  • Internal tank volume: 11 liters (0.39 cubic feet).
  • Maximum pressure allowed: 3,000 psi (207 bar)
  • 80 cubic feet = 2,265 liters (1 cubic foot = 28.317 liters)

How Long Will My Breathing Gas Last in an Aluminum 80?

Depth (Feet)

Environmental Pressure
(Atmospheres)

Breathing gas Needs (Liters per minute)

At rest

Light to moderate activity

Vigorous exercise

0 feet (Surface)

1 ATM

215 minutes

70 minutes

20 minutes

30 feet

2 ATM

107 minutes

35 minutes

10 minutes

100 feet

4 ATM

53 minutes

17 minutes

5 minutes


Next: The Most Common Ways to Run Out of Air >

Safety Tips to Prevent Out of Air Emergencies

blank

1
Maintain your equipment regularly and inspect any rental equipment carefully.

2
Use a written predive checklist and plan the maximum depth and duration of your dive that can be safely achieved with the available supply.

3
Open the tank valve all the way. (Consider buying a tank with an open/close valve indicator.)

4
Conduct a predive test breath on your regulator and make sure your tank is full before the dive. Also, check the gas line and complete an in-water buddy check before descending.

5
Carry an independent emergency gas reserve. Two independent gas sources are better than one. It may help you in your own emergency or if another diver requests your breathing gas.

6
Monitor your tank pressure at regular intervals.

7
Stay within your dive training limits.

8
Turn back when you exhaust half of your available gas supply and make sure you conserve enough air for flotation on the surface.

Before the DiveTurn BackBring to the Surface
3000 psi1500 psi500 psi

9
Adjust your buoyancy in protected, shallow water. If you find you have buoyancy problems, abort the dive and fix the problem.

Safety Starts With You

This is an easily avoidable mistake that can carry serious repercussions. The best strategy is not to run out of gas. If you run out of your gas toward the end of dive, your buddies are probably also low on gas and there may not be enough supply to manage two stressed divers. Monitoring your gas supply is a simple step to preventing a serious situation. Dive safely.

How to Deal with Other Ear Problems

blank

Middle Ear Barotrauma on Ascent, or Reverse Squeeze

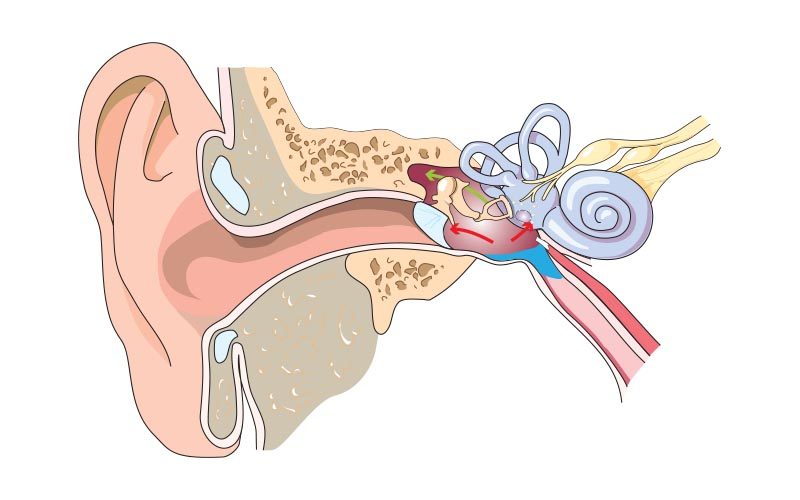
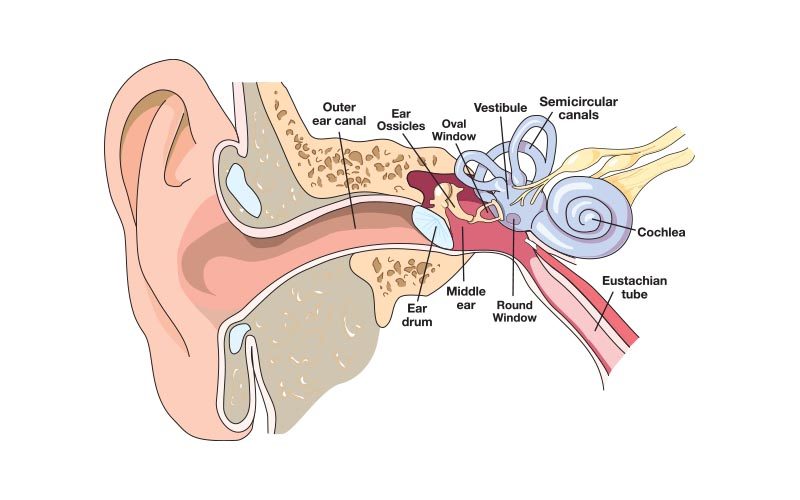
What happens: Pressure must be released from your middle ear as you ascend, or the expanding air will bulge and even break your eardrums. Normally, expanding air escapes down your Eustachian tubes, but if the tubes are blocked with mucus at depth (usually the result of poor equalization on descent, diving with a cold or relying on decongestants that wear off at depth), barotrauma can result.

blank

What you feel:

  • Pressure, then pain.
  • Some divers also feel vertigo from the unusual pressure on their balance mechanism.

What to do: Sometimes one of the equalizing techniques used on descent will clear your ears on ascent. Pointing the affected ear toward the bottom may help, too. Ascend as slowly as your air supply allows, remembering that the last 30 feet will be most difficult. Otherwise, you will just have to endure the pain to reach the surface.

Inner Ear Barotrauma

What happens: Sometimes, the stresses on your middle ear—from not equalizing or from trying too hard with a Valsalva technique—damage the adjacent inner ear hearing structures (the cochlea) and balance structures (the vestibular canals), and permanent incapacity can result.

blank

What you feel:

  • Deafness: Hearing loss can be complete, instant and permanent, but divers usually lose just the higher frequencies. The loss becomes noticeable only after a few hours. You may not be aware of the loss until you have a hearing test.
  • Ringing: You may experience “tinnitus,” a ringing or hissing in your ears.
  • Vertigo: The sense that the world is whirling around you, often accompanied by nausea.

What to do: Abort the dive and go as soon as possible to an ear, nose and throat specialist with experience treating divers. Inner ear injuries are tricky and require prompt, correct treatment
from a specialist.

Outer Ear Barotrauma

What happens: If your ear canal is blocked by a tight hood, a glob of wax or a non-vented ear plug, it becomes another dead air space that can’t equalize on descent. Your eardrum bulges outward, and increasing pressure in the surrounding tissues fills the canal with blood and fluid.

What you feel: It feels similar to middle ear barotrauma.

What to do: Keep your outer ear clear, which can be difficult for divers with exospores. These are hard, bony growths in the ear canal that can trap dirt and wax and even grow so big they completely block the ear canal. They are believed to be caused by repeated contact with cold water.

Prevention: Wear a hood. It will reduce the flow of water to your ears, and what does reach them will be warmer.

Can You Bend Your Ears? Yes. It’s called inner ear DCS (decompression sickness) and happens when micro bubbles form in the fluid-filled spaces of the inner ear, the cochlea and vestibular canals, following decompression. Symptoms are deafness, vertigo and tinnitus not attributable to barotrauma damage, and can occur without signs of central nervous system DCS, such as tingling and joint pain.

Bottom line: If you’ve pushed the limits, be alert for inner ear symptoms and go immediately to a specialist if you experience any problems. Barotrauma damage and DCS damage to the inner ear have similar symptoms, but the treatment is very different. Recompression, which helps when the cause is DCS, can make the problem worse when the cause is barotrauma.

Can You Dive with Barotrauma?

blank

OK, so you messed up on your first dive of your vacation, didn’t listen to the pain in your ears, and now you’ve got middle ear barotrauma. Your ears feel “full” (they are: with blood and mucus) and you can’t hear too well.

But you feel fine, and equalizing is no longer a problem. Can you continue to dive for the rest of the week you paid so much for?

Some divers do, but they are taking a serious risk of permanent loss of hearing or, even worse, balance control. In addition to the obvious risk of infection, remember that you can’t be sure you haven’t also damaged your inner ear at the same time. Symptoms of the latter aren’t always strong or immediate. All the medical advice says that if you’ve suffered middle-ear barotrauma, get out of the water and stay out until it clears up.

For more information, pick up a copy of The Ears & Diving reference book.


Vertigo – Which Way is Up?

blank

Vertigo, the sense that the world is spinning around you, is a common symptom of middle ear or inner ear injury. That’s because your balance mechanisms, called the vestibular canals, are located adjacent to both ear spaces. In fact, they’re considered part of your inner ears, and separated from the cochlea (the hearing structures) by the thinnest membranes in your body—two cells thick.

If vertigo happens under water, you may not be able to tell which way is up and panic. (Emergency tip: watch the water in your mask to judge your orientation and follow your bubbles, slowly, to the surface.) Additionally, vertigo is often accompanied by vomiting. Be prepared, but don’t be alarmed.

Damage to your vestibular canals, whether by DCS or by pressure shock, is usually permanent. Vertigo may go away in two to six weeks because your brain learns to compensate and ignores the side that’s damaged, but the canal will not heal. Damage the vestibular canals on the other side too, and you could be unable to drive a car, much less dive.

Vertigo can also occur from stimulation of one side and not the other—the pressure difference if only one ear equalizes or the temperature difference if cold water enters one ear but not the other. In both cases, your brain interprets unequal stimulation of your vestibular systems as movement. This type of vertigo disappears with the unequal stimulation, fortunately, and leaves no after-effects.

10 Tips for Easy Equalizing

blank

1. Listen For the “Pop”

Before you even board the boat, make sure that when you swallow you hear a “pop” or “click” in both ears. This tells you both Eustachian tubes are open.

2. Start Early

Several hours before your dive, begin gently equalizing your ears every few minutes. “This has great value and is said to help reduce the chances of a block early on descent,” says Dr. Ernest S. Campbell, webmaster of “Diving Medicine Online.” “Chewing gum between dives seems to help,” adds Dr. Campbell.

3. Equalize At the Surface

“Pre-pressurizing” at the surface helps get you past the critical first few feet of descent, where you’re often busy with dumping your BCD and clearing your mask. It may also inflate your Eustachian tubes so they are slightly bigger. The guide here is to pre-pressurize only if it seems to help you and to pressurize gently.

4. Descend Feet First

Air tends to rise up your Eustachian tubes, and fluid-like mucus tends to drain downward. Studies have shown a Valsalva maneuver requires 50% more force when you’re in a head-down position than head-up.

5. Look Up

Extending your neck tends to open your Eustachian tubes.

6. Use a Descent Line

Pulling yourself down an anchor or mooring line helps control your descent rate more accurately. Without a line, your descent rate will probably accelerate much more than you realize. A line also helps you stop your descent quickly if you feel pressure, before barotrauma has a chance to occur.

7. Stay Ahead

Equalize often, trying to maintain a slight positive pressure in your middle ears.

8. Stop If It Hurts

Don’t try to push through pain. Your Eustachian tubes are probably locked shut by pressure differential, and the only result will be barotrauma. If your ears begin to hurt, ascend a few feet and try equalizing again.

9. Avoid Tobacco and Alcohol

Both tobacco smoke and alcohol irritate your mucus membranes, promoting more mucus that can block your Eustachian tubes.

10. Keep Your Mask Clear

Water up your nose can irritate your mucus membranes, which then produce more of the stuff that clogs.

Next: How to Deal with Other Ear Problems >

English